
In short, the path from a bare frame to a delivered turnkey finish in Batumi is 13–14 sequential stages, from demolition and rough engineering to skirtings and doors. On timing, budget anywhere from 3–4 months for a studio to 8–12 months for an apartment of 80+ m². Plans and budgets are usually broken by the same thing: the renovation starts without a project, without measurements and without a contract. A normal renovation begins not with a hammer to the wall, but with the answer to the question "why are we doing this" and with a plan on paper.
Below is my practical guide as a Level Up site supervisor with 10 years of construction experience: where to start, which stages can't be reordered, why the screed needs 28 days (and in Batumi all 35–40), and where owners most often lose money and nerves.
Preparation: what to do before the start
Where renovation begins: goal-setting
Before counting materials, looking for a crew and leafing through tile catalogues, answer one question for yourself: why are we doing this? It's not philosophy, it's the owner's first practical task — defining the goal before the crew moves in.
In our experience, this question has three typical answers, and each leads to a different renovation.
Renovation for yourself. The "investing in comfort" logic. The budget goes into what the owner will see, touch and hear every day: window quality, soundproofing, plumbing, normal electrics with headroom, a convenient layout for one's own way of life. On these projects, no one cuts corners on rough engineering, because redoing it in five years means breaking everything open again.
Renovation for rental. The goal isn't "what I like" but "what will withstand a flow of tenants and not break in a year." Here durability matters: porcelain stoneware, washable paints, reliable mid-range mixers, sturdy furniture. Expensive designer tile doesn't pay back. What pays back is competent engineering and well-thought-out storage — that reduces the number of complaints and maintenance call-outs.
Renovation for resale. The goal is to sell the apartment profitably, not to live in it. The logic is even harder: invest only in what the buyer reads at the viewing and in the photos. Light, neutral finishes, modern bathroom tile, a tidy kitchen, no bold designer choices that narrow the buyer pool.
Everything changes from the answer: budget, materials, scope of work, sometimes even the layout.
Requirements and constraints: write them down before the start
The second step is to turn "I want it to look nice" into a normal technical brief. Sit down and write two things on paper: requirements and constraints.
Into requirements go all your wants and needs. How many sleeping places you need. Where the washing machine should go. Whether you need a study. Whether you want underfloor heating throughout the apartment or only in the bathroom and kitchen. Where the TV will be, how often you'll have guests, whether you need a dishwasher, how many burners on the cooktop, what bathtub — or perhaps a shower. The more detailed the list, the fewer redos later.
Into constraints goes everything that can't, hardly can or simply isn't worth changing: load-bearing walls, risers, the location of wet zones, budget, deadlines by which the renovation must absolutely be finished (family move-in, start of rentals). Add, definitely, the specifics of your particular building: ceiling height, slab thickness, available electrical capacity.
The main mistake at this step is to skip it and start the renovation without a project. I've seen dozens of such scenarios: the crew came in, did something "to their own judgement," and then the owner realises the sockets are in the wrong place, that he wants a two-door fridge and there isn't enough room for it, that he wants his own bathtub instead of the shower so he can lie in it, and doesn't know where to put it. Then we break the finished work and redo everything. The most expensive category of mistakes: you pay three times — for the first installation, the demolition and the second installation.
Until requirements and constraints are on paper, the renovation doesn't begin.
Layout and Remplaner
After requirements and constraints comes the layout. Have the option to work with a designer — great. Don't — the minimum the owner has to do is draw at least a schematic plan of the apartment.
A working option for self-planning is the Remplaner app. In it you assemble your ideal renovation: arrange the furniture, try different scenarios, check whether the sofa fits in the living room, whether there's enough room to walk between the kitchen units and the island, whether the washing machine fits in the bathroom next to the basin.
The point of the stage is simple: catch problems on paper, while fixing them costs zero. On paper it's easy to move a wall; in finished plaster it's already a separate construction job.
The plan solves several tasks at once:
- the layout of furniture and appliances becomes clear;
- from that, the scheme of sockets, switches, water and sewer outlets is calculated;
- it becomes clear where you need niches, where boxes, where underfloor heating;
- a basis appears for the conversation with the crew and for counting materials.
Without a layout, the renovation turns into improvisation as you go, and improvisation always means redos.
Laser measurement, not the developer's paperwork
A separate point, mandatory for Batumi: we measure the apartment ourselves, with a laser. We don't trust the developer's dimensions. We don't trust what's written in the documents. We take a rangefinder or a tape measure and check.
A discrepancy of 5–10 centimetres between the documents and reality here is the norm, not a rare exception. For the rough stage that seems like little, but as soon as you get to planning the kitchen, wardrobes, tile and doors, those centimetres turn into real problems. A kitchen ordered to paper sizes won't sit in place. The wardrobe pushes into the wall. The tile doesn't add up to a beautiful layout. The door frame doesn't fit the opening.
What we measure:
- the lengths of all walls separately (not "a 4 by 5 room");
- ceiling heights at several points — they drift too;
- room diagonals, to understand how "square" the corners are;
- the width and height of window and door openings;
- the thickness of walls and partitions.
These numbers are the basis for everything: project, kitchen order, tile calculation, doors. Half an hour with a laser at the start saves weeks of redos at the end.
14 stages of renovation in Batumi
The renovation itself is a strict sequence of works. The order can't be changed: each next stage rests on the previous one, any rearrangement breaks the technology.
- Demolition (if it's a renovation in a secondary apartment). Tearing out the old finish, partitions, plumbing, screed — anything that doesn't fit the new project.
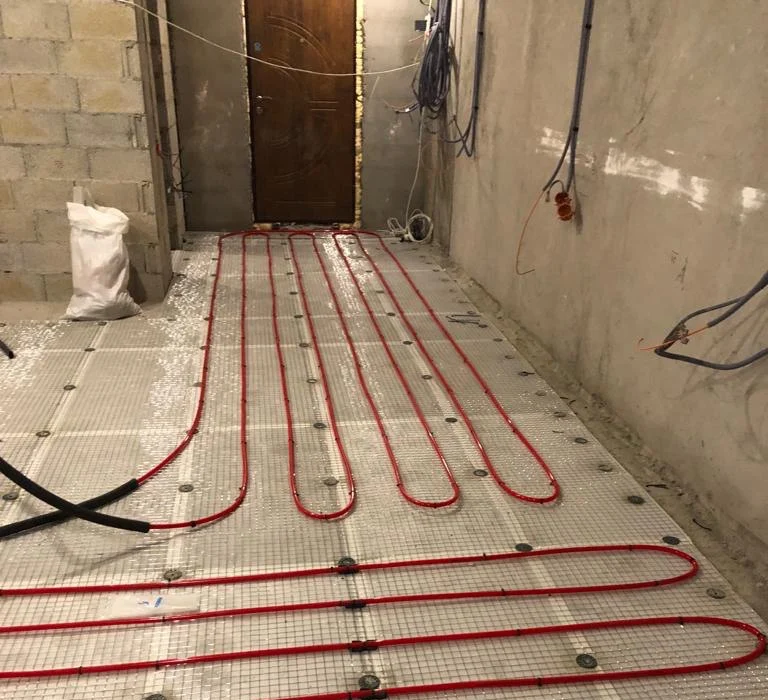
- Rough engineering. Electrics, plumbing, ventilation, underfloor heating. At this stage, everything that will later be hidden by finishing is laid into the walls and the floor. Mistakes here are the most expensive, because access is closed for years.
- Waterproofing. Protection of wet zones — bathrooms, sometimes the kitchen and balconies. In Batumi, with its humidity, this is a critical stage.
- Insulation. Where the project requires: external walls, balconies, structures in contact with cold and damp.
- Screed. The levelling layer of the floor under the final flooring. One of the longest stages by timing because of the mandatory drying.
- Plaster. Levelling the walls under the final finish. Also tied to long drying.
- Ceiling installation. Frames for drywall or stretch ceilings, lighting layout in the ceiling, mounting the structures.
- Tile laying. Only after the screed and plaster have fully dried, and not before.
- Final wall finishing. Filling, painting, wallpaper — all the wall finish.
- Final flooring. Parquet, laminate, vinyl floors — what's laid on a dry, ready screed.
- Plumbing fixtures and appliance installation. Toilets, basins, baths, showers, mixers, household appliances.
- Final electrics. Mounting sockets, switches, light fittings, connecting all appliances.
- Installation of outdoor air-conditioner units. External units, refrigerant lines, commissioning.
- Installation of skirtings and doors. The final touch that closes floor-to-wall joints and completes the picture.
That's 14 items, and that's normal. The numbering isn't the main thing — the process is: dirty wet works go first, clean dry ones later, and between them there must be technological pauses for drying.
Timelines and drying
How long a renovation in Batumi takes
The most common question at the start is how long all of this will take. Real timelines depend strongly on the area and complexity of the apartment. Below are guidelines from practice, not from marketing.
| Area | Minimum | Realistic |
|---|---|---|
| Studio / 1 room (30–50 m²) | 3–4 mo | 5–6 mo |
| 2 rooms (50–80 m²) | 4–5 mo | 6–8 mo |
| 3+ rooms (80+ m²) | 6 mo | 8–12 mo |
"Minimum" is the scenario in which everything goes to plan: materials arrived on time, the crew didn't drift to other sites, the season was dry, no redos. That happens rarely.
"Realistic" is the timeline worth putting in the contract with the crew and in your own expectations. It accounts for the usual delays: waiting for materials from Tbilisi, drying screed and plaster in Batumi humidity, small redos that always come up along the way.
If someone promises a studio renovation in 1.5 months — that's a risk marker, not a reason to celebrate. Most likely the drying technology is being broken, and a year later the owner will see cracks, lifting tiles and bubbling paint. And no, "let's do it faster" doesn't work here.
Rainy season and the physics of screed
Some works can't be sped up. It's not a question of crew motivation or money, it's a question of the physics and chemistry of the materials. The most telling example is the floor screed.
By the standard, the screed has to dry at least 28 days before tile is laid. It's not "the crew is being lazy," it's the time during which a cement screed gains strength and gives off excess moisture. Until then the floor is still "breathing" moisture, and any final flooring on top will lie on an unstable base.
In Batumi it's even more interesting. Because of the high humidity, especially in the rainy season, the real screed drying time stretches to 35–40 days. The air is already saturated with moisture, and the screed gives up its own more slowly than somewhere with a dry climate. No reason to panic, just a climatic reality that has to be built into the schedule.
The main mistake here is to lay tile a week after the screed. "It's dry on top, let's keep going." What happens next:
- moisture from the depth of the screed continues to escape — now through the tile and the tile adhesive;
- the substrate under the tile changes geometry as it dries;
- the tile comes away from the substrate, "drumming" patches appear;
- cracks run along the joints and the tiles themselves.
The result — the tile floor has to be relaid. Knock off the finished tile, clean the substrate, buy material again, pay for the work a second time. The cost of that mistake is many times higher than the cost of the 3–4 "lost" weeks of waiting.
The rule is iron: 28 days minimum, in Batumi with the seasonal correction budget up to 35–40 days. Under no circumstances let the crew talk you into "doing it faster."
Plaster and why you can't speed it up with heat guns
With plaster the logic is the same. By the standard it dries at least 7–14 days before filling and painting. On the packaging, the manufacturer always lists their own timing, calculated for "average" conditions: normal temperature and normal humidity.
In Batumi there are no "average" conditions. Because of air humidity, plaster dries longer than what's written on the pack. And it's not a defect of the material, not a problem of the crew, it's a feature of the climate. To the stated times you usually have to add a margin: plan for the upper bound of 14 days, and in the rainy season more.
And here a temptation arises: "let's put up heat guns and dry the plaster faster." That's not okay, and it's not superstition, it's physics again.
Under normal conditions, moisture leaves plaster evenly: from the surface and from the depth of the layer. The layer gains strength and keeps its geometry. If you turn on a heat gun, the surface layer dries quickly while the inner one doesn't. Uneven stress builds up across the thickness. The result is predictable: the plaster has a high probability of cracking.
Then those cracks come through the filler and the paint, and on a freshly renovated wall a web of micro-cracks appears. Cured only by redoing it: knock off the plaster, plaster again, dry properly, fill, paint. Double the work and double the money.
No heat guns on plaster. Only normal drying by technology, even if that means an extra week in the schedule.
Logistics, contract and payment
Order materials in advance
A separate Batumi specific is logistics. A lot of what's ordered for a renovation comes from Tbilisi, and it comes in over weeks: some tile, porcelain stoneware, plumbing, made-to-order furniture, specific finishing materials.
From this comes a simple consequence: order materials in advance, with a margin on time, not "when we get to that stage." The ideal scheme is to plan purchases into the overall schedule so that the material arrives on site before the crew needs it, not on the day the stage begins.
What happens if you don't do that:
- the crew gets to laying tile and the tile isn't there, it's still en route;
- the site idles, the crew goes off to another;
- when the tile arrives, the crew is busy, and you wait;
- sometimes the wrong thing arrives, the wrong quantity, or with breakage — re-ordered;
- timelines slip by months.
Materials are a separate area of responsibility for the owner or the site supervisor. The moment the project is signed and the layout is clear, a purchase list and a schedule of arrivals are formed. Better to wait an extra week at the start and order everything with a margin than to lose months of waiting in the middle of the renovation.
Contract and payment scheme with the crew
The financial-and-legal side is what burns down the most renovations in Batumi. Works, deadlines, scope, materials, party responsibilities have to be clearly written into the contract. Not "agreed verbally," not "the site supervisor said he'd make it" — a written document with:
- a list of all works by stage;
- timelines per stage and the final delivery date;
- the cost of works and the order of payment;
- who buys materials and who is responsible for their quality;
- conditions for accepting each stage;
- liability for missed deadlines and redos.
The main rule is no large advance payments. Honestly, the logic is simple: the moment the site supervisor gets money up front, his motivation runs out. The site goes into the queue behind those where the money is still ahead. The renovation starts to "drift": the crew is on site today, not tomorrow. Timelines stretch, the owner pays extra for "unforeseen" work, and finishing the renovation becomes almost impossible.
The healthy scheme is payment by stages, in arrears. The stage is done and accepted by the owner — the stage is paid. Move on to the next. This scheme aligns interests: the crew has a reason to close the stage quickly and to a high standard, because only then does the money come.
Good crews in Batumi are usually willing to work in arrears. We at Level Up work exactly this way: payment is tied to closed stages, not to an advance at the start. If a site supervisor insists on a large prepayment and isn't willing to discuss stage-based payment — that's a serious reason to think about whether to work with him at all. It's possible his previous projects remained unfinished, and the new advance is needed to close old debts (a kind of pyramid of unfinished renovations).
Main mistakes at each stage
If you collect the typical mistakes that turn a normal renovation into a long-running build and a redo into one place, you get a short but painful list.
- Mistake: starting renovation without a project. The crew works "as it thinks," then we break the finished and redo it for actual needs. You pay twice or three times for the same piece of work.
- Mistake: trusting the developer's dimensions. A discrepancy of 5–10 cm surfaces at the kitchen, wardrobe, door and tile stages. The kitchen doesn't sit, the tile doesn't add up, the doors don't fit the openings.
- Mistake: laying tile a week after the screed. The tile comes off the substrate, cracks run along the tile and the joints. The floors are redone from scratch, knocking off the old tile and re-purchasing.
- Mistake: speeding up plaster with heat guns. The plaster cracks from uneven drying, cracks come through the filler and the paint. The walls have to be re-plastered.
- Mistake: paying the crew a large prepayment. The site supervisor loses motivation, the renovation drags out, the site idles, "unforeseen" extra payments appear. Finishing such a renovation without losses is almost impossible.
- Mistake: ordering materials on the fly, not in advance. The crew runs into the absence of tile, plumbing or doors, the site stalls for weeks, sometimes the crew leaves for another project. Timelines slip by months.
- Mistake: verbal agreements instead of a contract. It's impossible to lock in deadlines, scope and responsibility. Any dispute is decided unilaterally — usually not in the owner's favour.
All these mistakes share one trait: they cost manifold more than the steps that prevent them. The project, laser measurement, normal drying, the contract and stage-based payment aren't "extra complications" — they're the cheapest part of the renovation.
FAQ
Takeaways
- A renovation in Batumi is 13–14 strict stages from demolition to skirtings and doors; you can't reorder them, the sequence is dictated by technology.
- Realistic timelines: studio and one-bedroom 5–6 months, two-bedroom 6–8 months, three rooms and more 8–12 months. The minimums (3–4, 4–5, 6 months respectively) are only possible in an ideal scenario.
- A renovation begins not with a hammer but with goal-setting: for yourself, for rental or for resale — that changes everything, down to the budget and materials.
- The project, written-out requirements and constraints, layout in Remplaner and laser measurement of the apartment are the cheapest part of the renovation, saving months of redos.
- Screed dries at least 28 days, in Batumi up to 35–40; laying tile earlier is a guaranteed path to having to redo it.
- Plaster dries 7–14 days and longer; you can't speed it up with heat guns — cracks will run through the entire finish.
- Materials are ordered in advance: a significant share comes in from Tbilisi over weeks, logistics is a separate area of responsibility.
- All works, timelines and payments — in the contract; payment in arrears by stage, no large advance payments.